Create a Custom Backend Task
Introduction
Flowable provides a wide variety of out-of-the-box tasks which you can use to model your cases. But sometimes there are custom elements which are specific to your domain or business. Since these tasks are not provided by Flowable, you can extend the set of out-of-the-box tasks with your own.
This guide describes how you can create your own backend tasks, use them in Flowable Design, and execute them in Flowable Work/Engage. A custom service task implementation is called a palette element or stencil in Flowable Design. A palette is the name for all steps available for a specific model type (for example, the case or CMMN palette).
As an example, we are going to create a palette element which calculates the addition of two numbers. Note that this could just be done with an expression ${a + b} — this guide is rather to demonstrate the principle for more complex programming or integration logic.
The code for this guide can be found at GitHub.
Prerequisites
Before starting, ensure you have:
- Flowable Design running (for modeling the palette and case)
- Flowable Work running (for executing the case)
- A Java project set up with the Flowable Work dependencies
Step 1: Create the Palette File
The palette file defines the custom task and its properties. Flowable Design looks on the classpath location com/flowable/config/custom/palette for custom palette configuration files. Create a .palette file in this directory (e.g., demo.palette):
{
  "$schema": "https://developer-docs.flowable.com/schemas/palette.json",
  "Palette-Id": "demo-palette-extension",
  "title": "Demo Palette Extension",
  "patchPalettes": ["flowable-work-process-palette", "flowable-work-case-palette"],
  "resourceBundles": ["com/flowable/config/custom/palette/translation"],
  "groups": {
    "math": {
      "index": 10
    }
  },
  "stencils": [
    {
      "id": "AdditionServiceTask",
      "superId": "ServiceTask",
      "groups": [
        "math"
      ],
      "properties": [
        {
          "id": "input-a",
          "category": "commonDetails",
          "type": "SimpleTextExpression",
          "index": 10,
          "optional": false
        },
        {
          "id": "input-b",
          "category": "commonDetails",
          "type": "SimpleTextExpression",
          "index": 20,
          "optional": false
        },
        {
          "id": "output",
          "category": "commonDetails",
          "type": "SimpleText",
          "optional": false,
          "index": 30,
          "variableExtractor": {
            "type": "simple"
          }
        },
        {
          "id": "delegateexpression",
          "value": "${mathAPlusB}",
          "visible": false
        },
        {
          "id": "expression",
          "visible": false
        },
        {
          "id": "classfields",
          "visible": false
        },
        {
          "id": "class",
          "visible": false
        },
        {
          "id": "servicetasktriggerable",
          "visible": false
        },
        {
          "id": "resultvariable",
          "visible": false
        },
        {
          "id": "includeinhistory",
          "visible": false
        },
        {
          "id": "servicetaskUseLocalScopeForResultVariable",
          "visible": false
        }
      ]
    }
  ]
}
Key elements:
patchPalettes: Includes bothflowable-work-process-paletteandflowable-work-case-palette, making this task available in both BPMN and CMMN editors.superId: "ServiceTask": Inherits from the service task stencil.delegateexpression: Points to the Spring bean${mathAPlusB}that implements the logic.- Custom properties (
input-a,input-b,output):SimpleTextExpressionallows entering static text or JUEL expressions. Hidden properties keep the UI clean.
Step 2: Add Translations
Create com/flowable/config/custom/palette/translation.properties:
group.math.title=Math

AdditionServiceTask.title=Addition
AdditionServiceTask.description=Task to add two variables

property.input-a.title=Input A
property.input-a.description=The first input
property.input-b.title=Input B
property.input-b.description=The second input
property.output.title=Output Name
property.output.description=The output variable name
Step 3: Add Custom Icons (Optional)
Add icon properties to the stencil:
"icon": "../palette-icons?id=component-presentations/palette-icons/add.png",
"bigIcon": "../palette-icons?id=component-presentations/palette-icons/add.svg",
Place images in com/flowable/config/custom/palette/component-presentations/palette-icons.
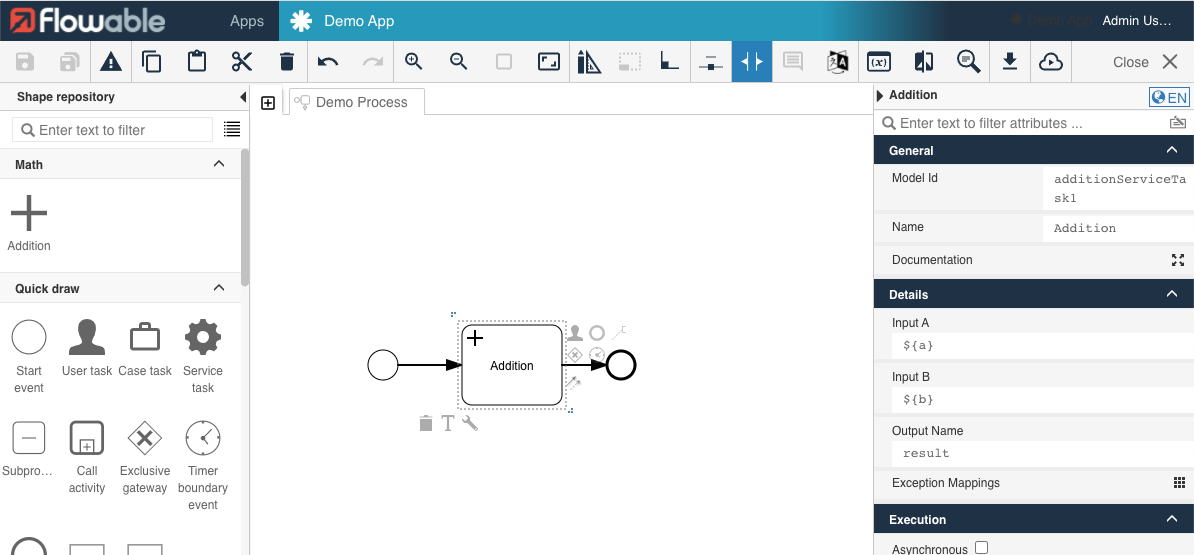
Step 4: Restart Design and Use the Task
After adding the palette file, restart Flowable Design to apply the patched palette. The custom task now appears in the CMMN palette under the "Math" group. Add it to your case model and configure the input and output fields.
Step 5: Implement the Task
Create a Spring bean in Flowable Work/Engage. The AbstractPlatformTask class implements both JavaDelegate (BPMN) and PlanItemJavaDelegate (CMMN), so the same implementation works for both process and case models:
package com.flowable.palette.work;

import org.flowable.common.engine.api.variable.VariableContainer;
import org.springframework.stereotype.Service;

import com.flowable.platform.tasks.AbstractPlatformTask;
import com.flowable.platform.tasks.ExtensionElementsContainer;

@Service
public class MathAPlusB extends AbstractPlatformTask {

    @Override
    public void executeTask(VariableContainer variableContainer, ExtensionElementsContainer extensionElementsContainer) {
        int inputA = getExtensionElementValue("input-a", extensionElementsContainer, variableContainer, 0);
        int inputB = getExtensionElementValue("input-b", extensionElementsContainer, variableContainer, 0);
        String output = getStringExtensionElementValue("output", extensionElementsContainer, variableContainer, "r");

        variableContainer.setVariable(output, inputA + inputB);
    }
}
 note
noteEnsure your class is in a package covered by your Spring Boot component scan.
The VariableContainer is a common interface between DelegateExecution (BPMN) and PlanItemJavaDelegate (CMMN), providing access to all case variables. The helper methods resolve expressions against the current context — for example, ${a} resolves to the actual variable value.
Step 6: Restart Work and Test
Restart Flowable Work to make the bean available. Start a new case instance — the custom task executes and creates a variable with the calculated result.
Further Reading
- Implement a Custom Service Task for detailed developer documentation
- Palette Customization for advanced palette configuration
- JSON Schema for IDE support in palette files