Email Inbound Channel
Introduction
You can use the email inbound channel to receive emails from an IMAP server and pass them into process or case instances, with or without using correlation based on instance data.
You can use the event registry to orchestrate events. Normally, those events are coming from a message bus (like Kafka, RabbitMQ, ActiveMq, etc.). For some use cases however, you would also like to receive emails and correlate them to your processes or cases. This also means that all concepts and modeling capabilities available when working with events, apply to incoming emails too.
Email Event Model
To represent an incoming email you first need to create an event model that captures the data.
Typically, you are able to specify all the event model attributes by yourself. However, for email there is an out-of-the-box event model that can be used.
Go to your app model, click on Add model, select the Include an existing model in the app in the first step and then find the system event model for email:
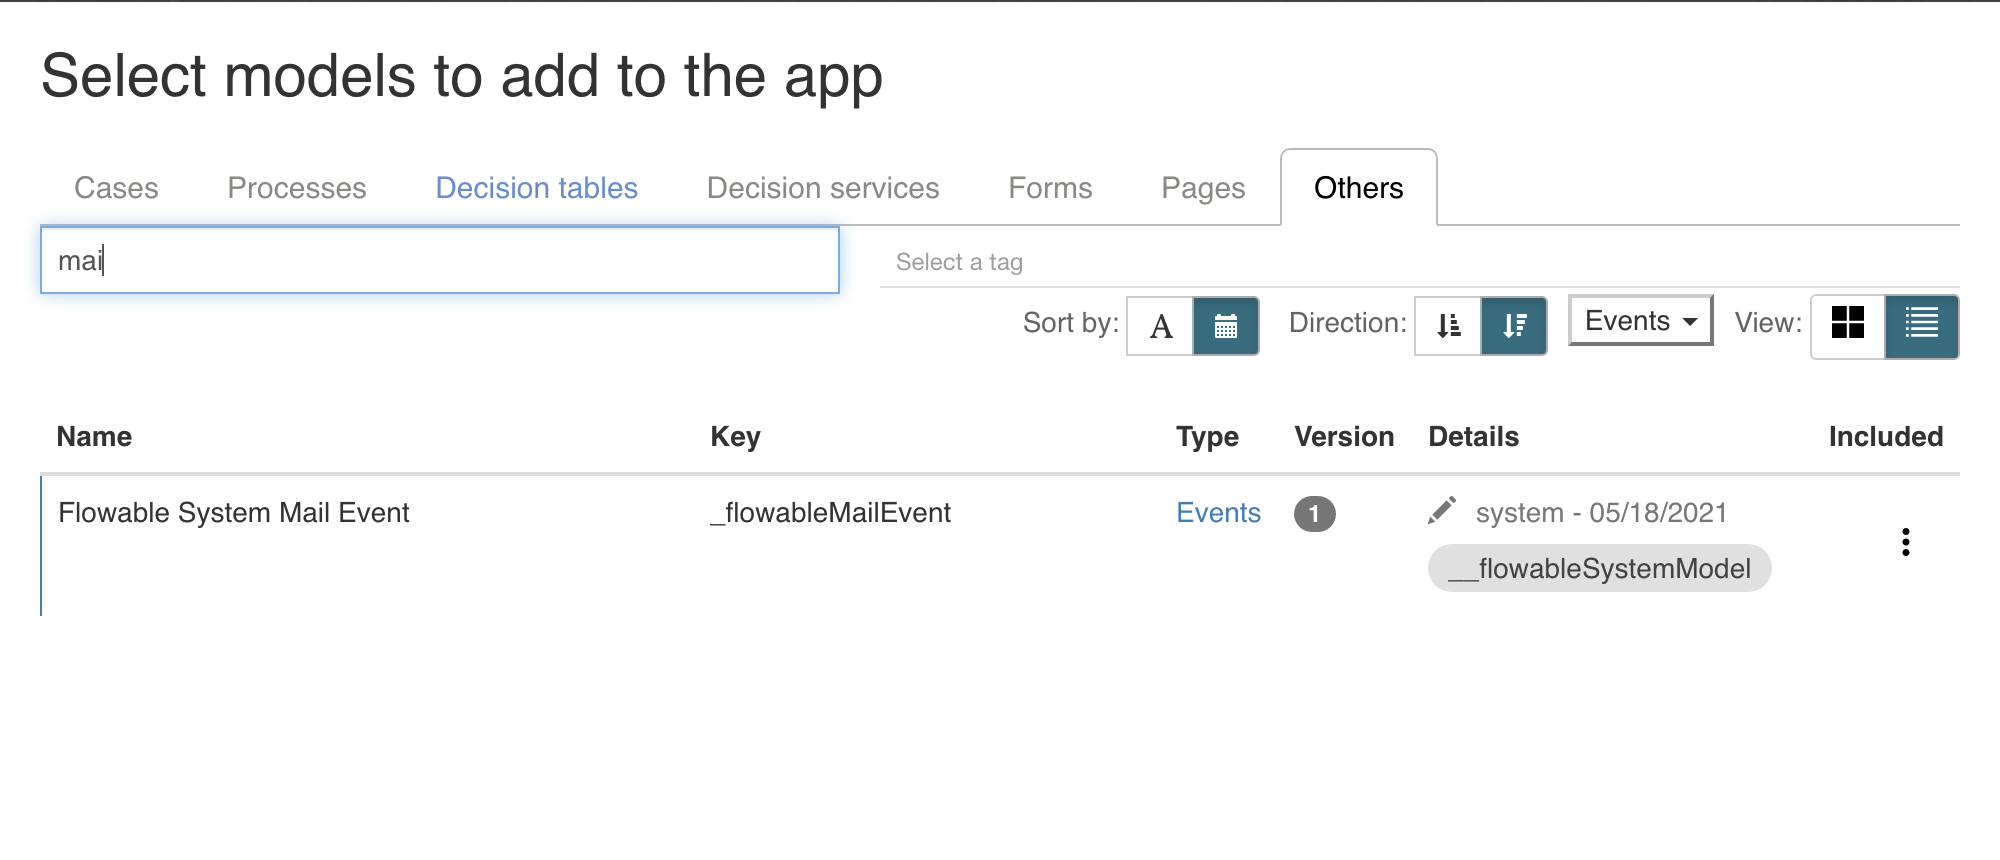
 note
noteThe event model is part of the app model, but it won't be deployed to a Flowable Work system, as a system model (like the mail event model) is already deployed by default there.
Technical configuration
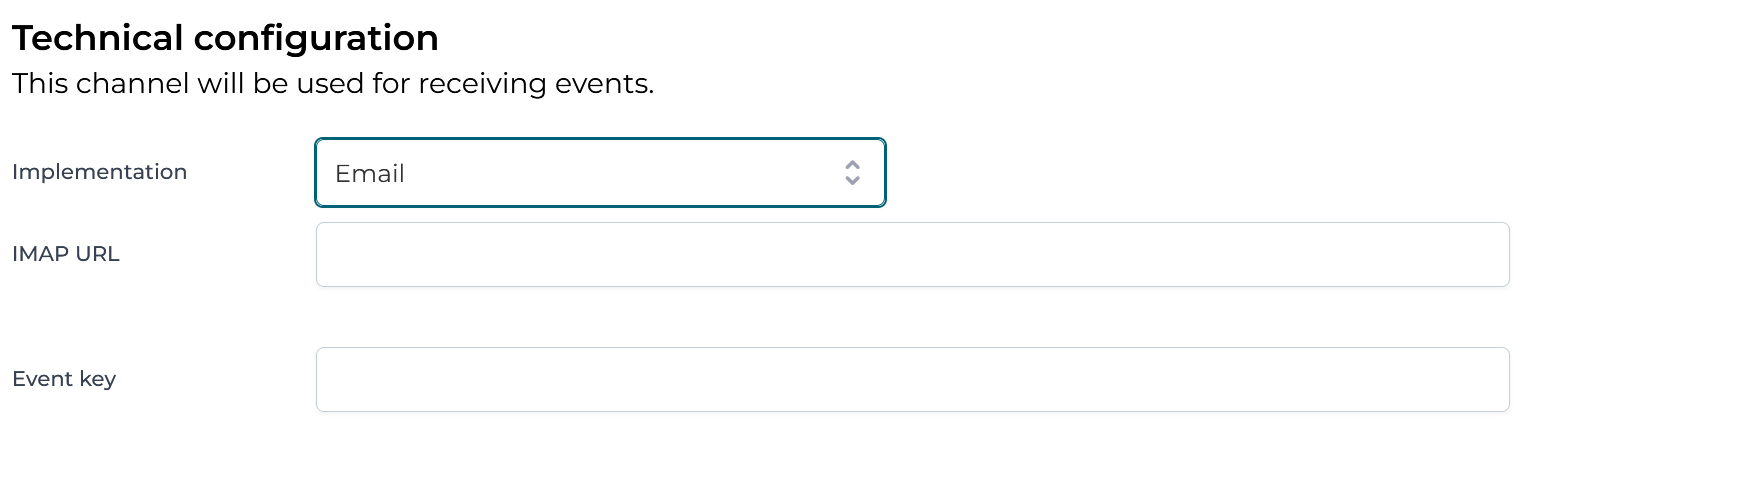
In this section the email IMAP URL that the channel should listen to needs to be configured. An expression can be used to determine the URL that should be consumed.
Advanced configuration
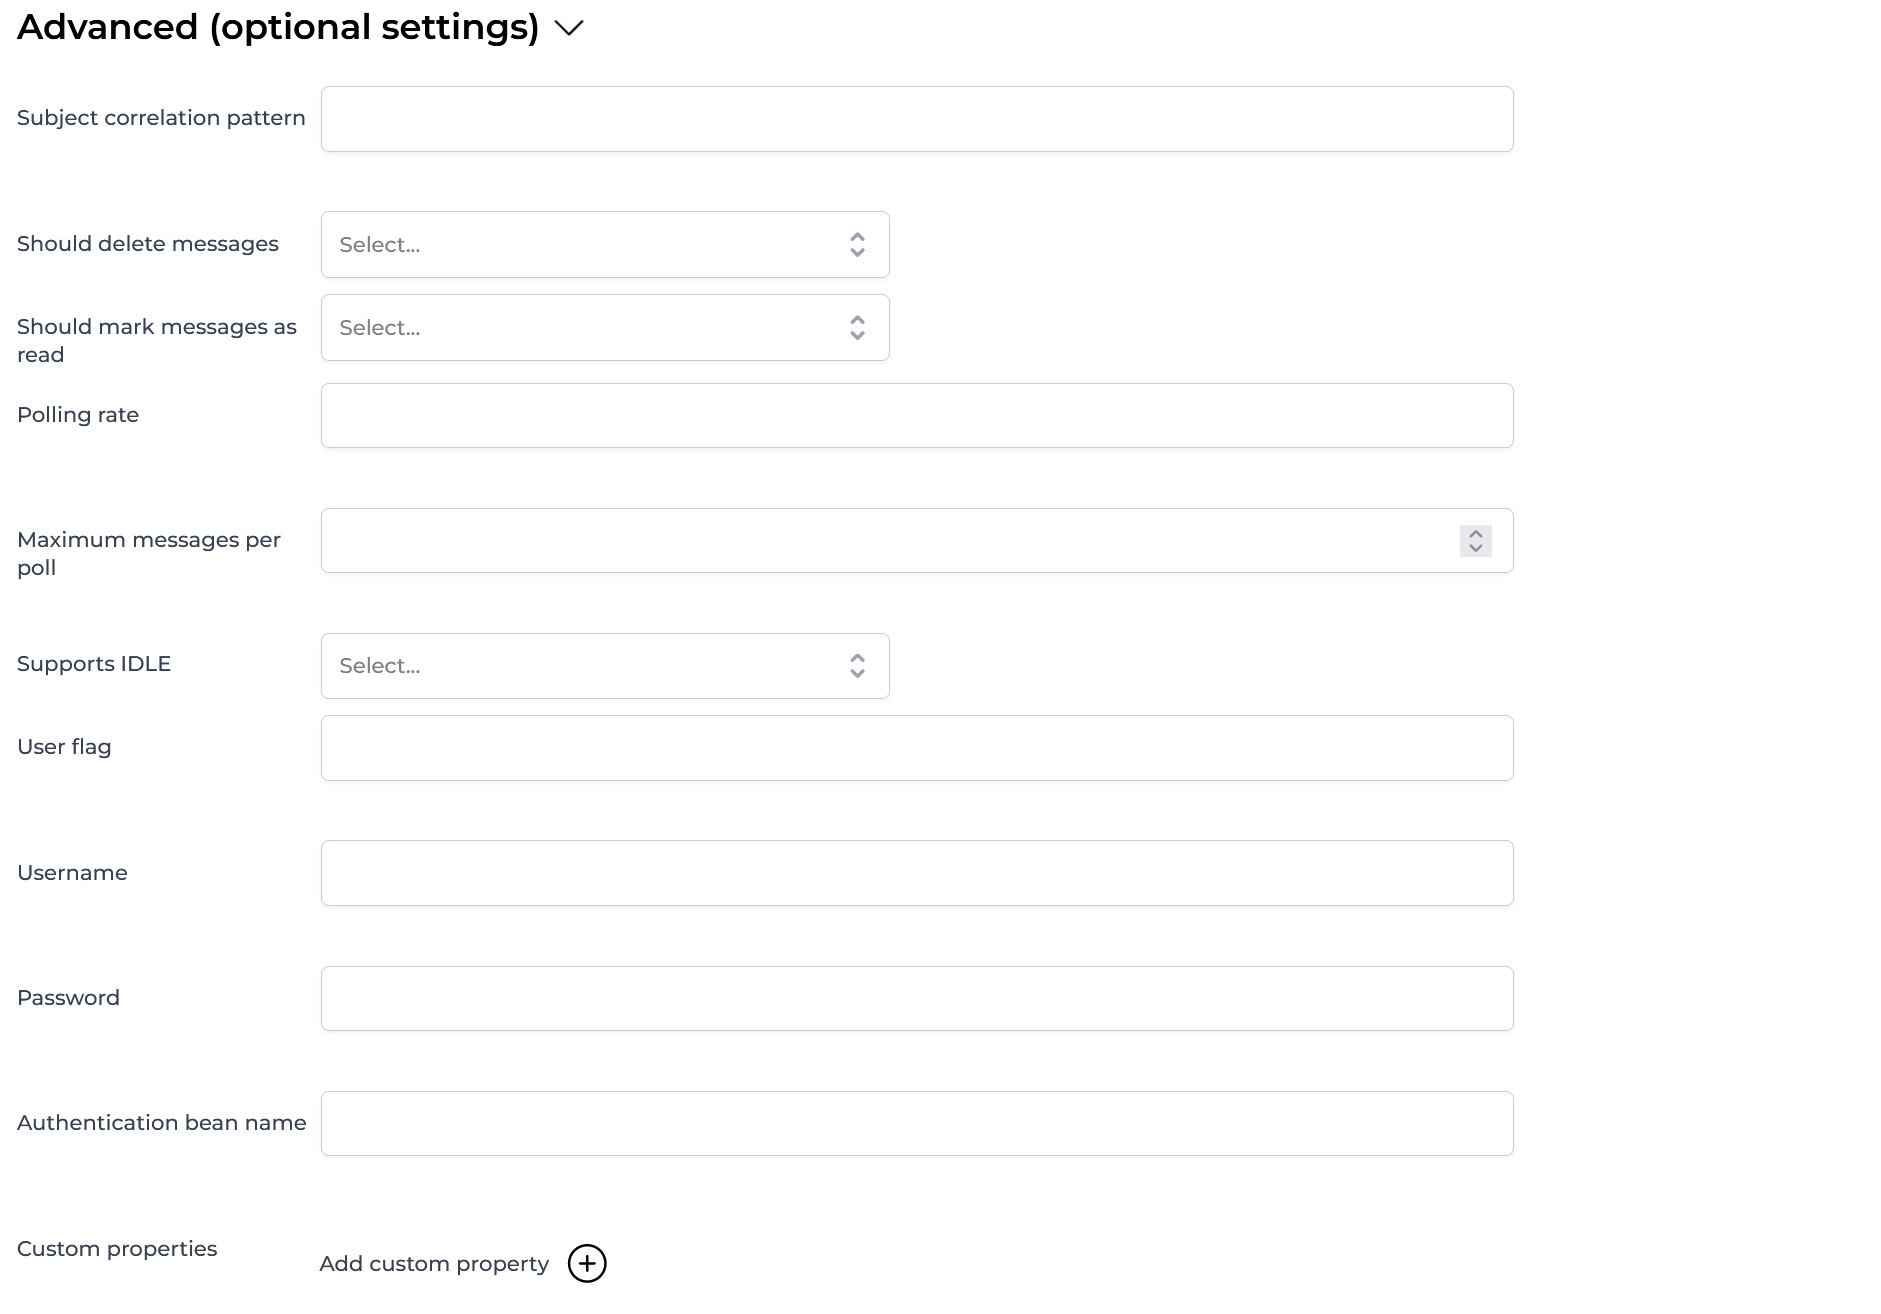
All options here are optional and allow using expressions. The available options are:
- Subject correlation pattern - A regex pattern that will be used to extract the subject correlation parameter. All the groups from the regex will be concatenated to create the subject correlation. As an example, to extract the case id within brackets from the subject as a correlation parameter, use this regex:
\[(CAS-.*)\]so, "[CAS-12345] Email subject" would result inCAS-12345being the subject correlation parameter. - Default subject correlation 2026.1.0+ - A fixed value that is used as the subject correlation whenever the subject correlation pattern produces no value (no match or a blank result), or when no pattern is configured at all. When the pattern produces a non-blank value, that value is used and the fixed value is ignored. Leave this empty (or blank) to use no subject correlation in those cases.
- Should delete messages - Whether messages should be deleted after they've been received.
- Should mark messages as read - Whether messages should be marked as read once they've been received.
- Polling rate - An ISO 8601 Duration value that will be used for setting the frequency at which the messages will be polled from the mail server.
- Max messages per poll - Number indicating how many messages should be processed per polling interval. Setting this to -1 will process all available messages in a single polling interval.
- Username - The username that should be used to authenticate the connection with the Mail Server
- Password - The password that should be used to authenticate the connection with the Mail Server. This doesn't have to be hardcoded password, it can be a SpEL expression that will load the password from system properties.
- Authentication Bean name - The name of the bean which is an instance of
javax.mail.Authenticatorthat will be used as the authenticator. If this is set the username and password are not used. - Custom properties - A mail consumer can have many custom mail properties set. These can be set here.
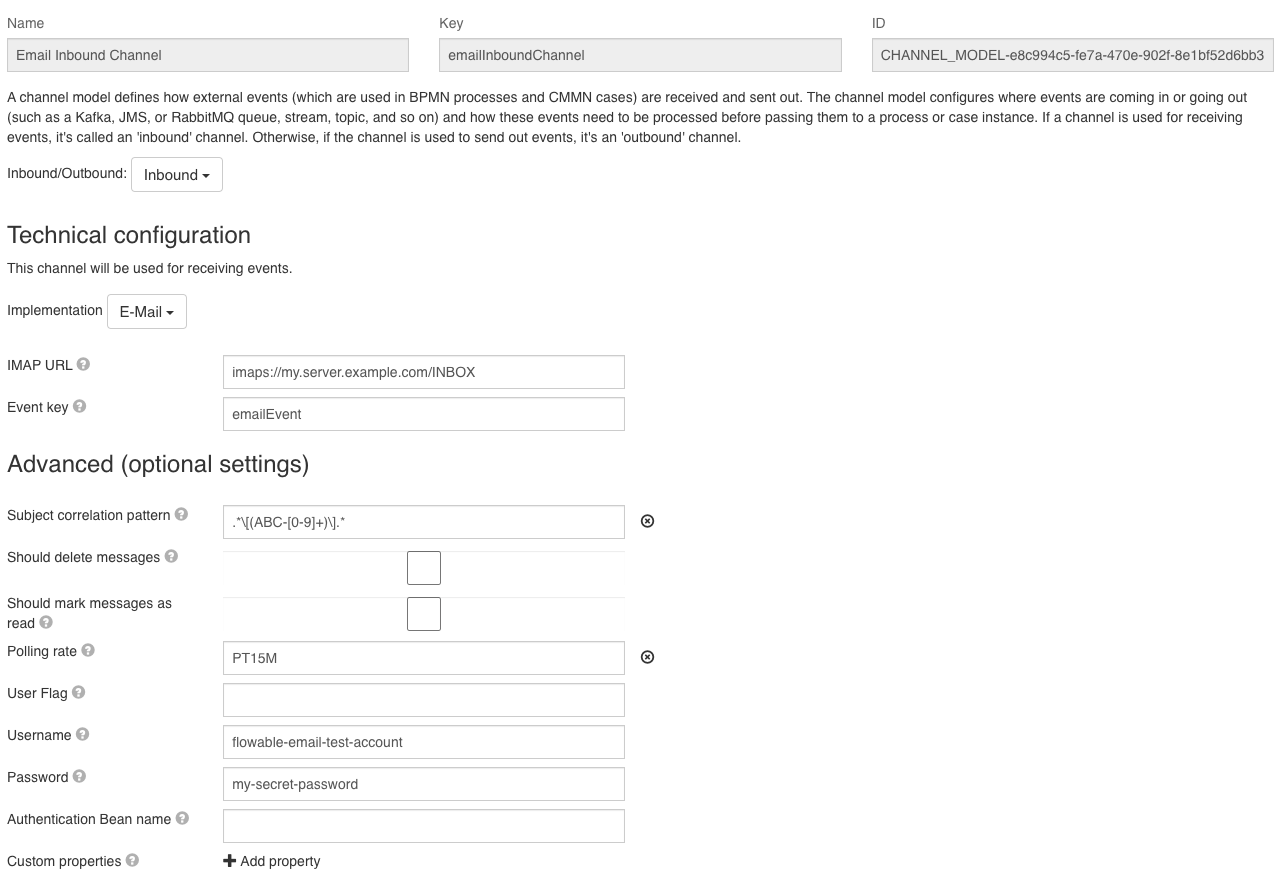
A complete configuration could look like this:
To avoid saving the credentials of your mail server inside the channel configuration, you can also configure Spring Boot properties of your Flowable Work application instead:
flowable.eventregistry.mail.channels.<channel-definition-key>.authentication-username=
flowable.eventregistry.mail.channels.<channel-definition-key>.authentication-password=
The <channel-definition-key> needs to be replaced with the appropriate key.
Tenant Detection
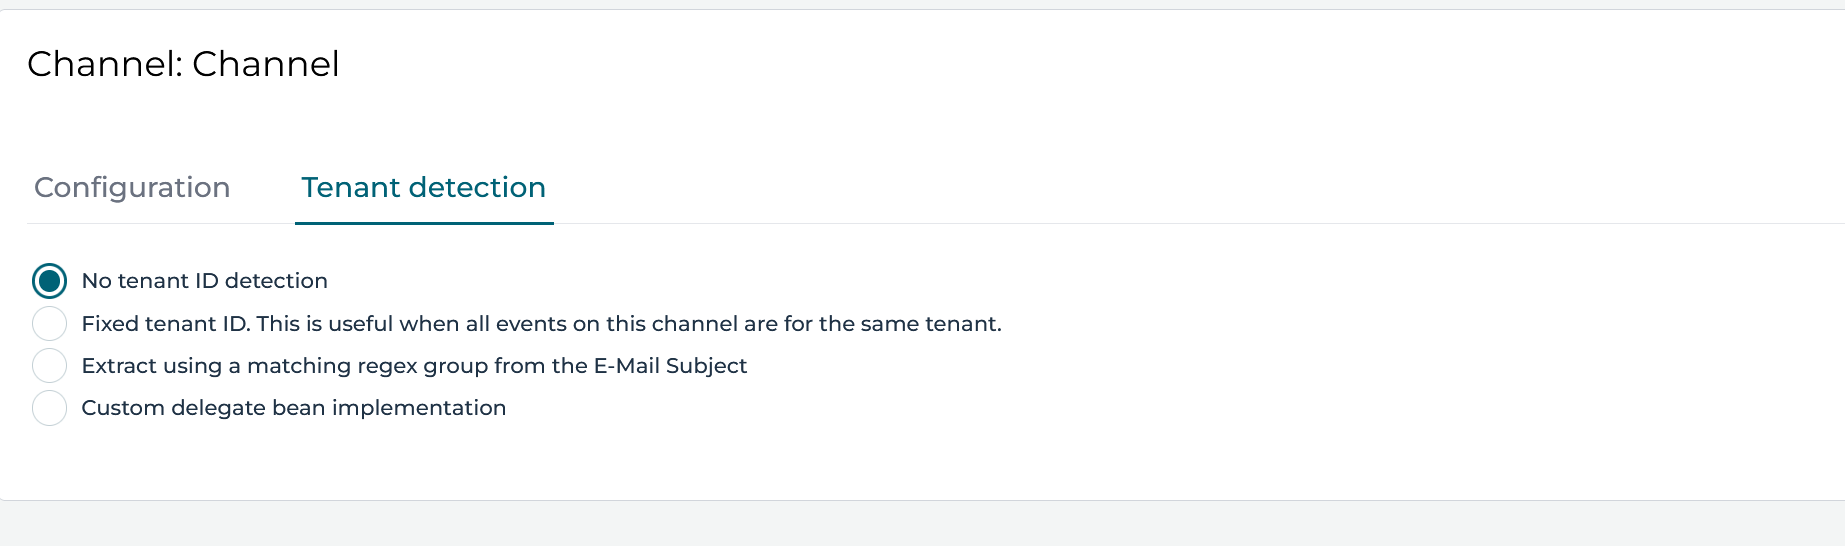
The email channel provides a tenant detection section (under the second tab at the top) that allows you to configure to which tenant the received email event should be sent.
There are the following options:
- No tenant ID detection - The event will be sent to the same tenant in which the channel is deployed
- Fixed tenant ID - Allows you to provide a fix value for the tenant in which the events should be sent to. When set, every event received via this channel will be sent to the provided tenant.
- Extract using a matching regex group from the E-Mail Subject - Allows you to configure a regex pattern that will be used to extract the tenant ID. All the groups from the regex will be concatenated to create the tenant ID. As an example, to extract the tenant ID within brackets from the subject, use this regex:
\[TENANT-(.*)\]so, "[TENANT-flowable] Email subject" would result inflowablebeing the tenant ID. - Custom delegate bean implementation - Allows you to provide an expression that resolves to a
org.flowable.eventregistry.api.InboundEventTenantDetectorimplementation on the Flowable servers on which this channel model will be deployed.
Using the Event in a Process
A simple example process which is started by an email would look like this:

When you insert an event registry start event and click on it, you can specify channel and event:
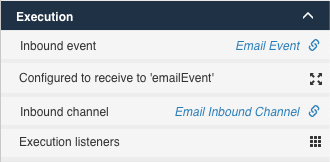
Opening the Configured to receive to 'emailEvent' will show you the detailed event configuration.
Here, you can specify if you would like to create an instance for every event or for each event which correlates.
In addition, you can specify which attributes should be stored in which variables:
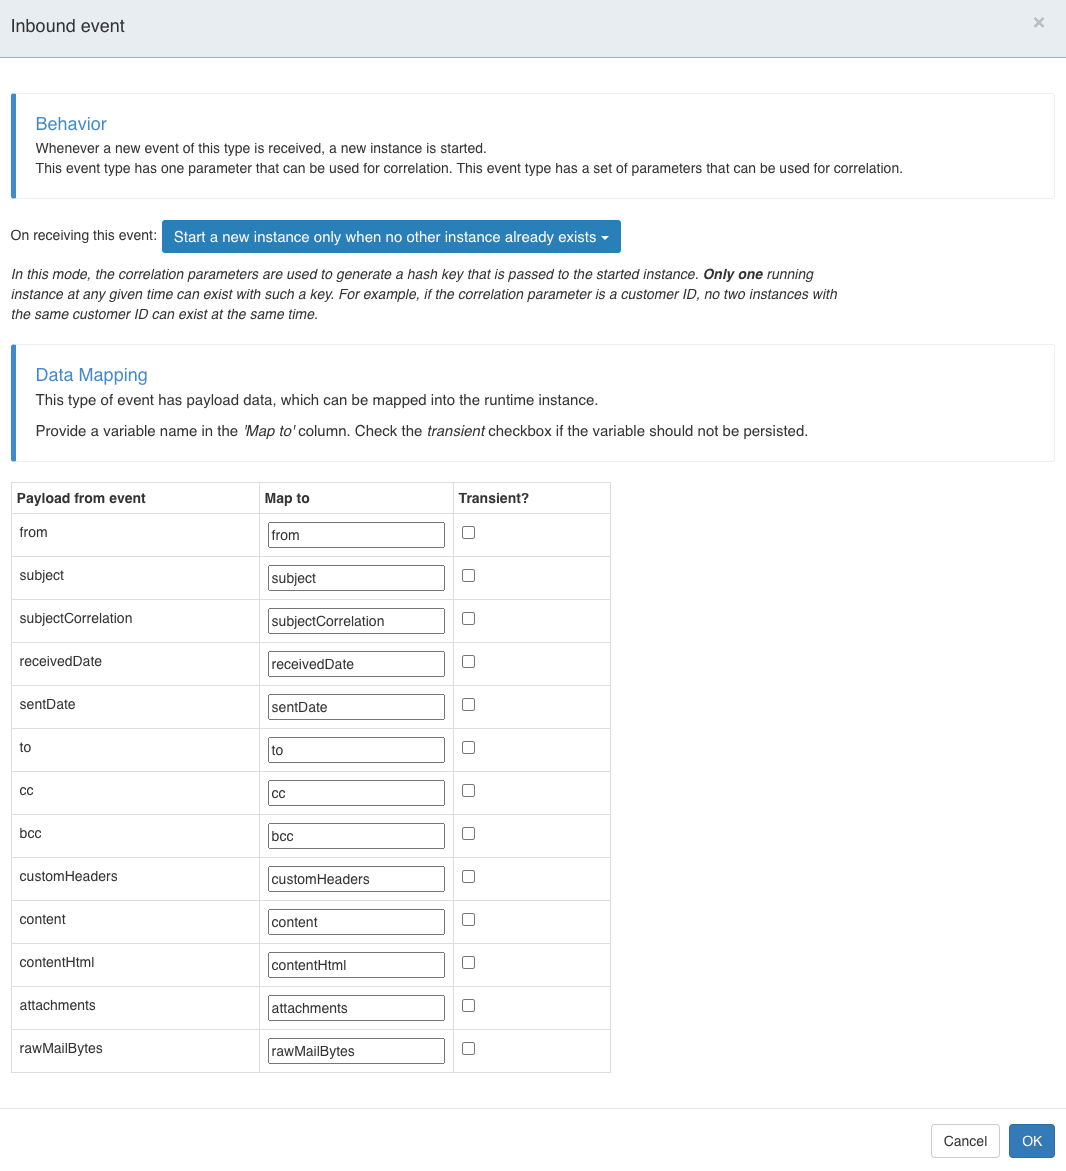
The above example would start only for each email with the same correlation one process.
Further incoming emails would stay unhandled, since the task is on only create one instance and there is no other event. The On receiving this event property can be changed accordingly if something else is needed.
noteIn case the needed field is not mapped directly, you can also use the rawMailBytes to extract it inside your code or process.
Attaching the Email to a Process
You can use the Create Document Task to generate a content item out of the email you just received. Therefore, you use the raw bytes the event is giving you.
Let's add a create document task to the process:
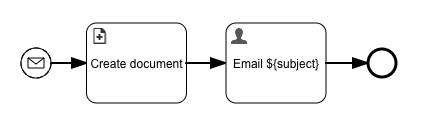
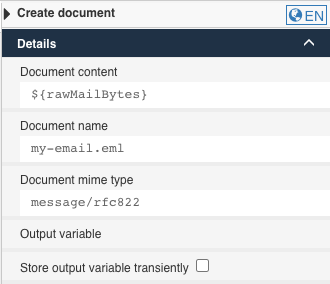
The configuration of the task is easy, you just need to give the email a name and pass in the raw bytes and set the content type to message/rfc822 (this will be suggested as E-Mail).
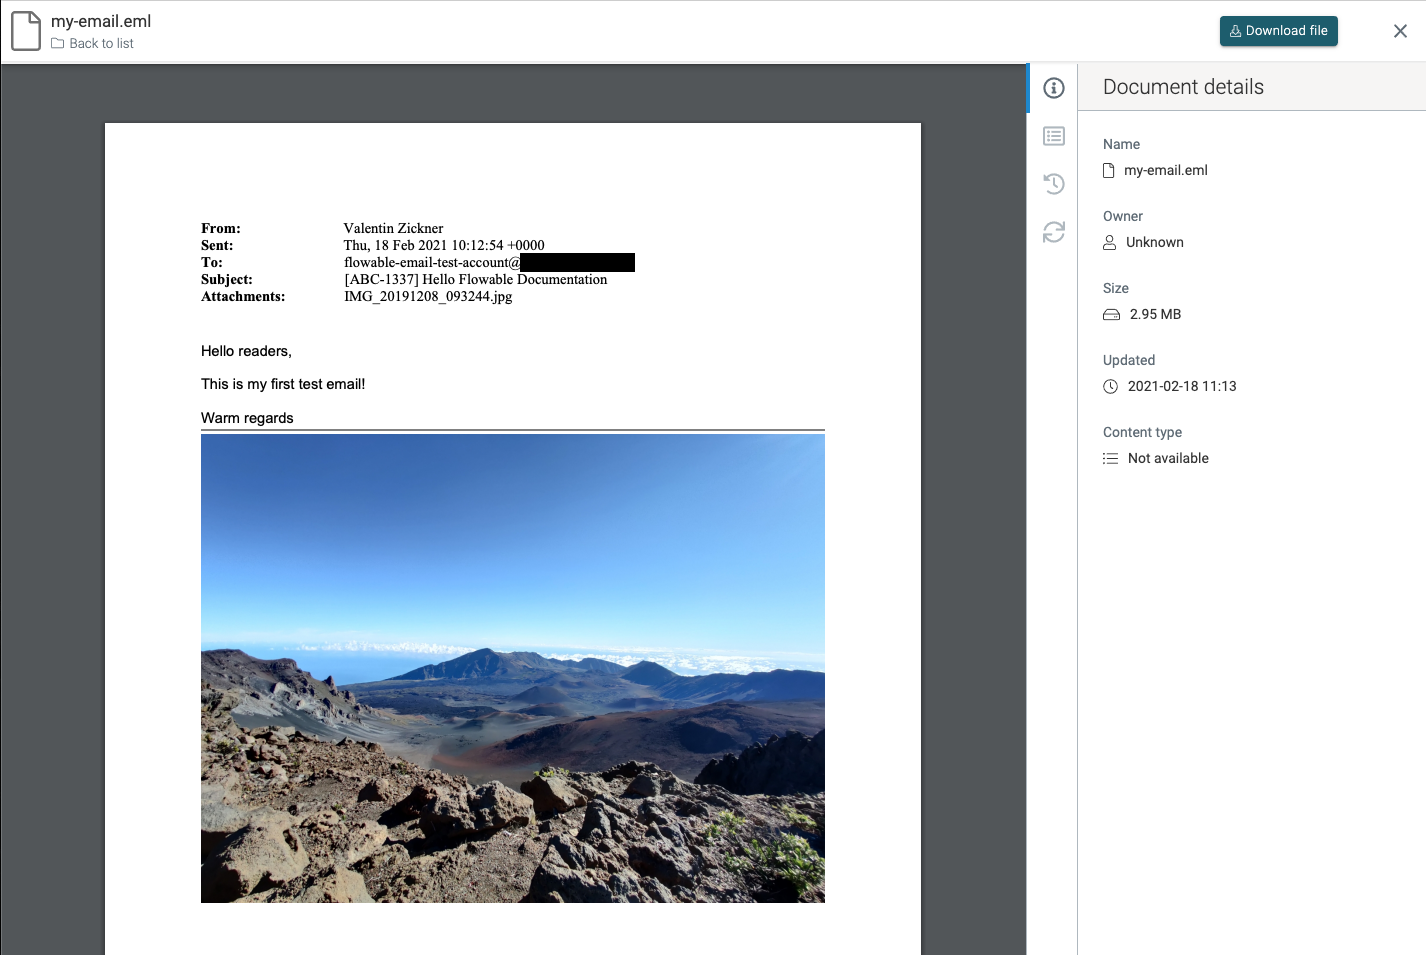
Looking at the new created instance you will see in the Documents tab an attachment with the email:
Attaching Documents to a Process
You can also add every single email attachment as a content item to your process.
The attachments field is null in case there are no attachments.
In case it's not null, it's a collection which you can iterate over, for example with the Create Document Task.
This can be used to create one content item per document.

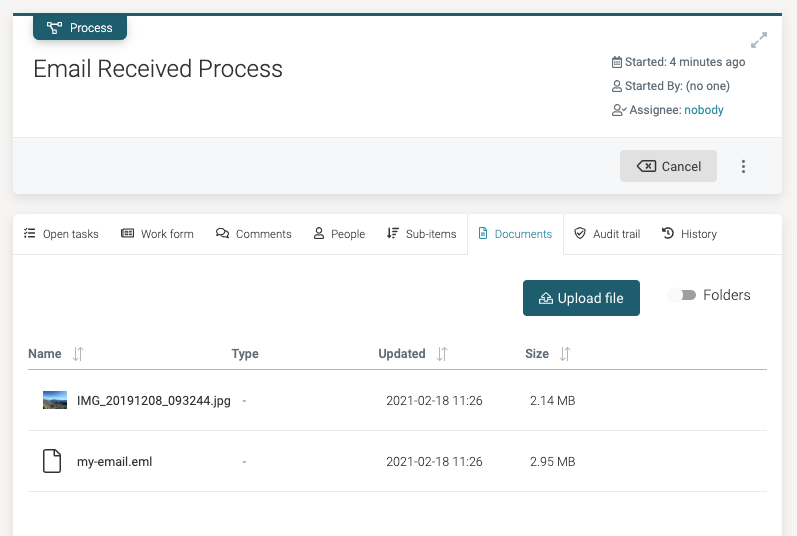
Once you now receive an email, you will find the email including the attachments in your Documents tab:
Using the Event in a Case
More advanced scenarios including email can easily be imagined. For example, you can use a case model to make your email handling smarter by using the typical 'if-this-then-do-that' pattern that's easy to do with CMMN:

For more complex scenarios, please also checkout the Getting Started with Channels and Events guide which covers more details about the event registry.
Token-based authentication (Microsoft Office 365)
v3.12.5+ v3.13.0+Some Email providers like Microsoft Office 365 require a token-based authentication instead of a password-based authentication. This section describes how to configure token-based authentication, to access your Email account for Microsoft Office 365.
In order to obtain access tokens, you need to register and configure your application in the Microsoft Azure Portal first. We published an extensive blog post about this topic, which covers in more detail.
Once the app is setup, you need to register the Spring Security OAuth2 client provider and client registration to your application.properties file. The following properties showcase the configuration for the OAuth2 client credentials flow:
spring.security.oauth2.client.provider.exchange-server-imap.issuer-uri=https://login.microsoftonline.com/<azureTenantId>/v2.0
spring.security.oauth2.client.registration.exchange-server-imap.client-id=<application_client_id>
spring.security.oauth2.client.registration.exchange-server-imap.client-secret=<client_secret>
spring.security.oauth2.client.registration.exchange-server-imap.scope=https://outlook.office365.com/.default
spring.security.oauth2.client.registration.exchange-server-imap.authorization-grant-type=client_credentials
The exchange-server-imap part of the properties is the client registration id. It is a custom name and can be named as desired.
Multiple providers and registrations are possible to authenticate against multiple OAuth2 endpoints.
You can find the endpoints of the issuer-uri, alongside all the other available endpoints for a registered app in the Microsoft Azure Portal for your app.
The following screenshot shows the configuration for the Email inbound channel:
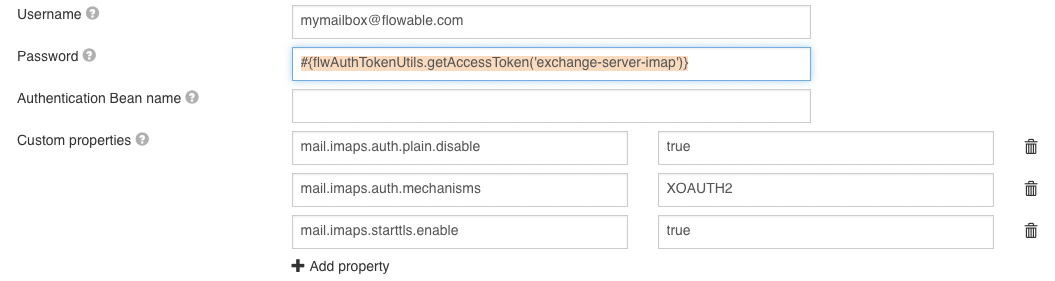
The password uses a Spring Expression Language expression to resolve the access token, which is obtained for the client registration shown above. The expression parameter 'exchange-server-imap' maps to client registration id above. Token expiration is handled automatically by the implementation. The custom properties are required to activate XOAUTH2 and to force the disabling of plain authentication (required for Office 365 as of writing this article).
In case something goes wrong, add the following additional custom properties to the configuration above:
mail.debugtotruemail.debug.authtotrue